Pages

Showing posts with label PrestaShop. Show all posts

Sunday, September 13, 2015

How to set up additional shipping costs for a specific product

To set up shipping for a product in PrestaShop 

1. Log into your PrestaShop Dashboard

2. Using the top menu bar, hover over the Catalog tab and click on the Product selection.

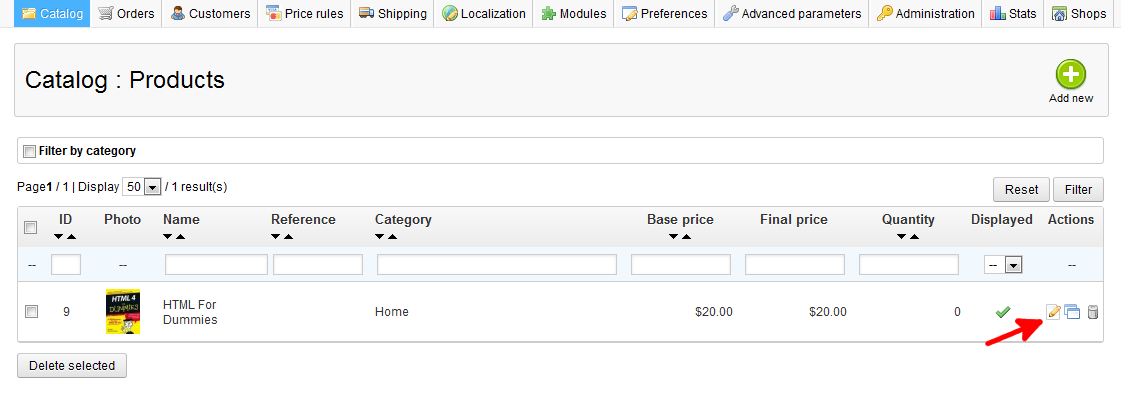
3. You are now on the Catalog: Products list page. From here, select the Edit icon (it looks like paper andpencil) on the right for the product you want to edit.


4. You are now on the Catalog : Edit Products page. From here click on the Shipping tab on the left sidebar.

5. On the Shipping page are several dimensions for the shipping package you need to enter width,height, depth, and weight. There is also a field named Additional shipping cost for you to add your shipping charge.

6. The Carriers list allows you to select the desired shipping carrier. Carriers are the package companies such as UPS or Fedex that delvier the product to the customer's doorstep. If one is not selected, any of them could be used to send the package. Once completed, select the green Save button in the upper right corner.


You have now successfully added shipping information to your product in PrestaShop
Friends, If you like this post, please share with your friends on Facebook and Google+ and recommend us on Google using the g+1 button on the top right hand corner.

Wednesday, May 21, 2014

How to edit product quantity in PrestaShop


After adding Product and adding shipping to your product, you will want to add inventory quantity to it. It is important to have correct inventory as it lets visitors order the products correctly. It also helps to let you know when you need to reorder the product. Manually adding inventory quantity to your product in PrestaShop is very simple and can be done by following the steps below.

To set up shipping for a product in PrestaShop :

1. Log into your PrestaShop 1.5 dashboard

2. Using the top menu bar, hover over the Catalog tab and click on the Product selection.
3. You are now on the Catalog: Products list page. From here, select the Edit icon (it looks like paper and pencil) on the right for the product you want to edit.


4. You are now on the Catalog : Edit Products page. From here click on the Quantities tab on the left sidebar.
5. As this is for manual quantity entry, ensure the radio button named I want to specify available quantities manually is selected. From here you will enter the number of your product you have on hand in the Quantity field.


Friends, If you like this post, please share with your friends on Facebook and Google+ and recommend us on Google using the g+1 button on the top right hand corner.

How to add shipping to your products in PrestaShop

To set up shipping for a product in PrestaShop 1.5:

1. Log into your PrestaShop 1.5

2. Using the top menu bar, hover over the Catalog tab and click on the Product selection.
3. You are now on the Catalog: Products list page. From here, select the Edit icon (it looks like paper and pencil) on the right for the product you want to edit.


4. You are now on the Catalog : Edit Products page. From here click on the Shipping tab on the left sidebar.

5. On the Shipping page are several dimensions for the shipping package you need to enter width,height, depth, and weight. There is also a field named Additional shipping cost for you to add your shipping charge.

6. The Carriers list allows you to select the desired shipping carrier. Carriers are the package companies that deliver the product to the customer's doorstep. If one is not selected, any of them could be used to send the package. Once completed, select the green Save button in the upper right corner.


You have now successfully added shipping information to your product in PrestaShop .
Friends, If you like this post, please share with your friends on Facebook and Google+ and recommend us on Google using the g+1 button on the top right hand corner.

How to Remove a Category In PrestaShop

After learning how to add categories to your store, we will now show you how to remove a category in PrestaShop

To remove a category in PrestaShop:

1. Log into your PrestaShop dashboard.

2. Using the top menu bar, hover over the Catalog tab and select Categories from the menu.
3. You are now on the Catalog: Categories page. There are two ways to remove a category. If you are removing only one, you can simply click the Delete icon (the one that looks like a trashcan) on the far right of the category row.

4. If you are removing more than one, you can select the ones you want to remove by selecting the respective check-boxes on the left hand side of the category. Once you have selected the ones you want to remove, click the Delete Selected button at the bottom.
5. You will be asked if you want to delete the products in the categories also. There are three choices here. You will want to pick the best answer for your current situation.
Click the Validate button once you have made your selection. 

6. Your updated category list should now appear on the screen.

Before
After

Friends, If you like this post, please share with your friends on Facebook and Google+ and recommend us on Google using the g+1 button on the top right hand corner.
How to add product images in PrestaShop

In our previous article, we showed you how to add a very basic product in PrestaShop. We didn't enter a description, add images, or set any price settings just yet. We will however begin to do these things, beginning with images. In this tutorial, we will show you how to add images to your products in PrestaShop.

To add an image to your product in PrestaShop :

1. Log into your PrestaShop.

2. Using the top menu bar, hover over the Catalog tab and click on the Product selection.
3.You are now on the Catalog: Products list page. From here, select the Edit icon on the right for the product you want to add an image to.
4. You are now on the Catalog : Edit Products page. From here click on the Images tab on the left sidebar.
5. This page is subtitled Add a new image to this product and has a simple button on the screen named Upload an image. Click the Upload an image button and pick your desired image from the local files on your computer. After selecting the image, it is automatically uploaded to the server, there is no need to click another upload or save type button.

The first image that you upload automatically becomes the Cover photo for the image.

 Now that we've uploaded an image, you can see in the screenshot below how the image is used on our storefront's New Products and Featured Products areas:
    Friends, If you like this post, please share with your friends on Facebook and Google+ and recommend us on Google using the g+1 button on the top right hand corner.

Monday, May 19, 2014

How to Change the Category Order In PrestaShop


1.Log into your PrestaShop dashboard.


2. Using the top menu bar, hover over the Catalog tab and select Categories from the menu.

3. You are now on the Catalog: Categories page, or the category editor. In order to change the display order, you need to look over to the right hand side of the screen. There is a Position column with some up and down arrows for each category. Use these to move the categories into the desired order. In this example, we will go for alphabetical order.


4.Refresh your screen and you should now see the categories in the same order as you placed them in the category editor. As you can see, our categories are now in alphabetical order.

Before 

After


Friends, If you like this post, please share with your friends on Facebook and Google+ and recommend us on Google using the g+1 button on the top right hand corner.

How to add a Product in PrestaShop


After you have finished installing PrestaShop, you can begin to add new products to your online store. In this introductory article, we are only going to focus on the very basic product requirements. There are many options you can set for products, however we will go more indepth into those in other tutorials.

To add a product to PrestaShop :


1. Log into your PrestaShop.


2. Using the top menu bar, hover over the Catalog tab and click on the Product selection.

3.You are now on the Catalog: Products list page. To add a new product, click on the green Add Newbutton in the upper right corner.


4. This is the Products: Global Information tab. Here is where you add all the basic information about the product. The only required information here is the product name. Once completed, click the green Save button in the upper right corner.

5. Your new product should now be listed in the product list.

Before


After


Now that we've added a new product to our store


Friends, If you like this post, please share with your friends on Facebook and Google+ and recommend us on Google using the g+1 button on the top right hand corner.

How to add Categories in PrestaShop


In order to organize your products, you will need to add categories to your PrestaShop 1.5 storefront. This allows the visitor to more easily browse your products by separating them into groups. Examples of categories may be laptops, mp3 players, paperbacks, mystery novels, etc. The instructions below demonstrate how to add a category to your PrestaShop 1.5 store.

To add a category in PrestaShop :


1.Log into your PrestaShop dashboard

2. Using the top menu bar, hover over the Catalog tab and select Categories from the menu.

3. You are now on the Catalog: Categories page. To add a new category, click on the green Add New button in the upper right corner.


4. Add all desired information for the category such as assigning the parent directory, adding adescription, meta tags, etc. Once finished, click the green Save button in the upper right corner.

5. Your new category should now appear in the Categories list. This category will also now display on your storefront with the other existing categories. Now you can start adding products to PrestaShop. If you have already added products, you can start adding your products to categories in PrestaShop.

Before

After


Friends, If you like this post, please share with your friends on Facebook and Google+ and recommend us on Google using the g+1 button on the top right hand corner.

How to log into PrestaShop


Before logging into the PrestaShop  Dashboard for the first time (manual installs only)


If you installed PrestaShop using Softacluous, then you can move to the next section on how to log into the PrestaShop dashboard. Otherwise, you will need to have completed the following tasks for security reasons:
1.Delete the install folder
2.Renamed the Admin folder (for example admin123, adminxyz, 123admin, xyzadmin, etc.) For sample purposes only, we will use admin123 as the new admin folder name.

If you manually installed PrestaShop , failure to do both of these will prevent you from being able to log into the dashboard.
To log into the PrestaShop Dashboard:

Visit your PrestaShop Dashboard login page


To get to the login area, type in your new admin URL based on what you renamed your admin folder. Using the example above (admin123), it would be http://www.sampledomain.com/admin123. You should see a login page like the one below:

Login using your email address and password


From there you will sign in with the email address and password you entered when installing the program. Upon successfully logging in, you should see your dashboard and all the tools necessary to build your new shopping cart.


Friends, If you like this post, please share with your friends on Facebook and Google+ and recommend us on Google using the g+1 button on the top right hand corner.

How to move image slider module from home to top in PrestaShop


In this tutorial you will read about PrestaShop image slider default module and you will know how to move it from home section to top section of your shop. By default, this module can't be transplanted to this part of your store. But it is possible to modify the module, it's simple and easy. 

As we say above, this module can't be transplanted to the top section of your shop, when you trying to do that in your back office you probably see this error:

How to modify the homeslider module?

In first step you must open the homeslider.php file localized in modules/homeslider directory. 

copy code attached below
public function hookdisplayTop(){
 if(!$this->_prepareHook())
 return;
 
 if ($this->context->getMobileDevice() != false)
 return false;
 
 $this->context->controller->addJS($this->_path.'js/jquery.bxSlider.min.js');
 $this->context->controller->addCSS($this->_path.'bx_styles.css');
 $this->context->controller->addJS($this->_path.'js/homeslider.js');
 return $this->display(__FILE__, 'homeslider.tpl');
}


and paste it into homeslider.php file just before the code: public function hookDisplayHome(). Save the file and go to the PrestaShop back office and try to transplant module homeslider to "Top of pages" known as "displayTop" position. Now everything works fine. You must also delete homeslider module from old position.

You transplanted homeslider module properly to new position, but as you probably see, there is something wrong like on image attached below. 


How to fix this issue?
So what to do? Go to homeslider module configuration and change the width parameter value to: 979

next you must open bx_styles.css file localized in modules/homeslider directory, edit the .bx_wrapper section exactly as above:


.bx-wrapper {
 margin-bottom:20px;
 height:300px;
 clear:both;
}

save changes and refresh your website. Now slider works properly.

Friends, If you like this post, please share with your friends on Facebook and Google+ and recommend us on Google using the g+1 button on the top right hand corner.

How to Install Prestashop on a local host WAMP server

Check you have a working WAMP installation

WAMP stands for Windows, Apache, mySQL, PHP. It refers to the key components used to run a lot of dynamic websites on a Windows Server. It often used for developing web applications on your local machine before putting it live on your server. You can get prebuilt installation routines that make installing a WAMP server a real breeze. The one I am using for this article can be found here www.wampserver.com. If you don't already have an installation the Download it and install it. Once it is installed you need to set it running. On Windows XP this is done by clicking on Start -> All Programs -> WampServer ->Start WampServer Once that is started you should see the WAMP server manager icon in the system control. See below for the WAMP server starting (Windows XP WAMP Shown)

Create a Database to install Prestashop in

After a successful WAMP install you will have mySQL server also installed. By default mySQL is installed with a username of root and a blank password. You can easily create and manage mySQL databases using a mySQL manager called phpmyadmin. You can access this by entering the following URL in your browser http://localhost/phpmyadmin/ Once this is open you should see a create database section. We need to create a database for our prestashop installation. So enter the name presta in the create database box and click "create"  You have created a blank database to install prestshop into. As this is a local test on your pc we have left the default security of login or root and no password. We will need to rememeber that for a little later in the install.

Down load and Unzip the prestashop install files

From the prestashop website download the prestashop install files www.prestashop.com/en/downloads/ Once intalled unzip them files under the default areas that wamp serves it's web sites from. This is usually c:\wamp\www\ Once unzipped you should have a folder structure like this.

Run the Prestashop installer

Open a web browser and open the the URL http://localhost This should pring up the wamp home page Scroll down the page and under the Your Projects you should see prestashop listed. Click on thisYou will see the the installer welcome page. Choose your language and click next.The prestashop installer will show you the prestashop requirements on the System Compatibility Page. You should find that most recent versions of WampServer 2+ should have all the requirements so you should not need to do anything. Do a quick check and ensure the requirements are met and then click next. Now on the Systems configuration page enter your database details. As this is a default install of WampServer you can lave the prestashop suggested configuration. Click Verify now!NOTE! Since this is Windows WAMP server there is no mail server or MTA installed so you can ignore the e-mail part as this won't work any way Then click Next From this point you should be pretty much ready to finish the install and have prestatshop installed. You will be asked to rename the default admin folder name which is pretty straight forward to do within windows.

Friends, If you like this post, please share with your friends on Facebook and Google+ and recommend us on Google using the g+1 button on the top right hand corner.